G’day mate! Traveling to Australia?
The world’s smallest continent is filled to the brim with exciting activities and delightful weather year-round. There are so many reasons to visit this sunny Australia, and the only thing in the way of our travel plans is the visa! Since Filipinos aren’t given visa-free entry to Australia yet, we’ll still need to go through an application process before heading down under!
To help ease the process, we’ve got a step-by-step guide that you can refer to when applying for an Australian tourist visa! Alternatively, you can also apply through VFS Global. You'll be enjoying bright and sunny Australia in no time!
More to love in Australia!
Must-Have Travel Essentials
Sydney
Melbourne
Gold Coast
General Essentials (All Australia)
How To Apply For An Australian Visa:
1. Decide on what type of Australian visa you need
Using the Visa Finder, determine what type of Australian visa you need! You would need to input this yourself since it requires you to choose (a) type of visa, (b) country of passport, and (c) age.
For this Australian visa guide, we’ll be tackling the Visitor Visa (Subclass 600) which lets tourists visit Australia for the following purposes:
- To visit or for business visitor purposes
- For up to 3, 6, or 12 months
You are eligible for the Visitor Visa (Subclass 600) if you are traveling to Australia:
- As a visitor
- For business visitor activities
- To visit family
Applicants who are granted a Visitor Visa (Subclass 600) can:
- Have a holiday
- Visit friends and family
- Undertake Business Visitor Activities
- Study for up to 3 months
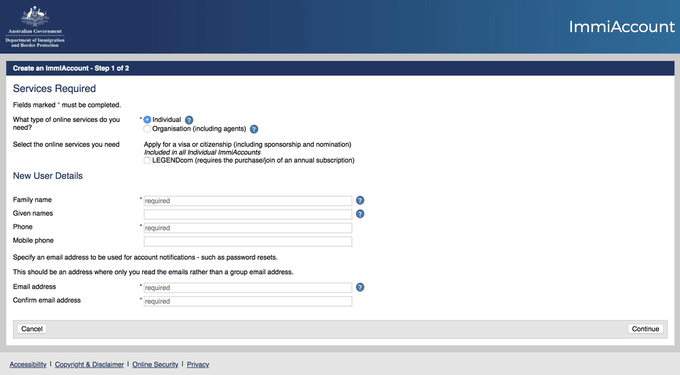
2. Sign up for an ImmiAccount
Afterwards, sign up and create an ImmiAccount, an online service is facilitated by the Australian Government. That said, this is the only site where you can get access to the online requirements. Without an ImmiAccount, you are unable to proceed with the visa application process.
* Those who are planning to travel in a group only need to create one account.
Note: Make sure to indicate a working email address. If you fail to provide a factual, working email address, you will not get any updates on your application whatsoever.
3. Accomplish the online application form
Once you’ve confirmed your ImmiAccount, you can proceed with filling out the online application form.
Questions will include personal information, travel history, financial capacity, purpose of visit, and health! Be prepared and make sure to input factual information into the system. Remember to always SAVE your information so you can edit the form anytime. With this feature, you can also cross-check the information in your application!
The ImmiAccount online application is equivalent to Form 1419, so you may use this as reference or a practice copy. However, there is no need to print this application since the online application saves the information input into the system.
Note: Do not click SUBMIT if you aren’t finished or if you have not double checked the indicated information.
4. Prepare the required documents for your application
Like any other visa application, several documents are required to support your application. Depending on your visa type and personal circumstance, a list of requirement will be given to your account. Though you can refer to this page for a vague list of requirements, here’s a list of specific documents we believe are important for your application:
Philippine Passport
- Photo page must have no broken lamination
- Passport is valid for more than 6 months from intended travel date
NSO Birth certificate
- If you intend to order your NSO Birth Certificate, you may order it here
Passport Size Photograph of applicant
- Official size is 45mm x 35mm against a plain background
- Applicants are required to write their name at the back of the photo
Previous and Current Visas
- For travel history, scan pages of all valid and expired visas and stamps
Bank Certificate
- Provide an original bank certificate issued within the past 3 months
- Note: Take into account the cost of your entire trip and daily expenses!
Income Tax Return
Certificate of Employment or Employment Contract
Sample Australia Itinerary
- Applicants will need to write down their activities per day
Flight and Hotel Reservations
- Although you don’t have to have these documents upon applying, it can possibly help your chances – but there are no guarantees.
- Providing a return flight ticket can prove that you have no intention of informally settling in Australia
Note: Additional requirements may be asked of you, depending on visa, citizenship application, and personal circumstances. Some applications may not require any documents, as well.
ALL these documents need to be scanned and uploaded to your ImmiAccount. Afterwards, tick the box to indicate that you’ve successfully uploaded the scanned documents to include in your application. Also, make sure documents are in .JPG, .PDF, or .PNG and must not exceed 5MB in size! Refer to this page to find out how you can properly attach the required documents to your ImmiAccount.
5. Pay the Application Fee
After reviewing your application form and required documents, you may proceed to payment! Although the application rates may vary depending on type of visa or even exchange rate, the Visitor Visa (Subclass 600) can cost around AUD140 to AUD1,020. Credit card fees may apply.
6. Submit application required documents
Once you’ve paid and double checked your application, it’s time to finally click the Submit button! Almost instantaneously, a notification and acknowledgement receipt will be sent to your registered email. From here, all you can do is wait for your Visa Grant Notice which can arrive in as short as two days to as long as a month. In some cases, additional documents may be required from you before the Visa Grant Notice will be given.
7. Print out Visa Grant Notice
If you received word that you’ve been granted an Australian visa, congratulations! The last thing you need to do is print the Visa Grant Notice to present this upon entering and exiting Australia!
Additional Tips for applying for an Australian Tourist Visa
1. Double check your requirements!
Go through your application and requirements as many times as you would like. It’s better to be safe than sorry, right? Certain parts may have been overlooked, or information indicated could be wrong or misspelled. If you can, have a friend who’s successfully applied for a Japan visa before look over your application as well!
2. The more documents, the better
If you don’t think that the required documents that you submitted are enough to support your application, you can send up to 60 files per applicant!
3. Provide proof of return to the Philippines
When you provide proof of your return to the Philippines, you’re informing the Australian Immigration Staff you have no intention of settling illegally. This can be in the form of a return flight ticket, certificate of employment, approved absence, or proof of travel!
4. Apply at least 3 months before intended departure
Though you can get your Australian visa as soon as two days after submission, it is also possible that it can take up to a month. But, don’t rush the process! This will allow you plan your trip properly.
For more information of Australia Tourist Visa requirements, visit this guide here!
Klook your way to Australia!
Once you’ve managed to get an Australian visa, it’s time to explore this country’s many regions! Want to hit up the action-packed district of Sydney? Or explore the contemporary art scene in Melbourne? Klook’s got you covered for a multitude of Australian activites! Check out our activities and make the most out of your trip at a budget-friendly price.

